- Top Trumpet Embouchure Techniques: Options for Beginners Through Professionals - October 12, 2022
- Is the Trumpet Hard to Learn? - September 30, 2022
- Best Leblanc Clarinet Models Guide: From Soprano to Contrabass - September 5, 2022
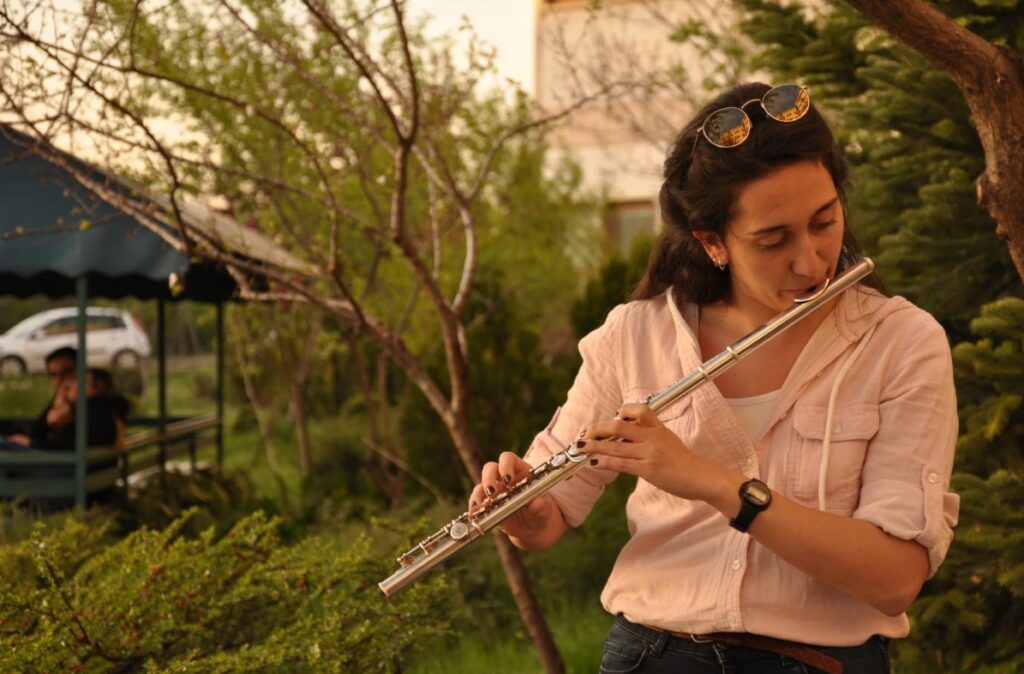
I’ve played the flute for over a decade, but I still sometimes need a flute fingering chart guide. Having a fingering chart can help if you need to learn basic notes, trills, or anything else.
You can learn a lot from a flute fingering chart as long as you can read it. Consider what goes into reading a flute fingering chart so that you can use it on your own.
Bottom Line Up Front: A good flute fingering chart should include standard and alternate fingerings. I love using The Woodwind Fingering Guide to reference almost any fingering I need to know.
Flute Range
Before you can read and understand a flute fingering chart, consider the flute range. This can help you learn how to play the flute, and you’ll know when you’re about to learn some of your last notes.
Most flutes can play from middle C (C4) to three octaves higher (C7). Some flutes have a low B key, so they can play a half step lower (B3).
Regardless of the flute they have, advanced players can play up to a D7 or even higher. However, most flute music doesn’t go much higher than that.
Other members of the flute family have a similar written range. Low flutes typically go down to a written C4 and up to a written C7, but most piccolos only play down to a written D4.
Flute Keys and Mechanisms
To help understand a flute fingering chart, you should consider the flute keys and mechanism. Not all flutes have all of the same keys, but most have some basic features.
Consider what the different keys on a flute do and what notes different key combinations can produce.
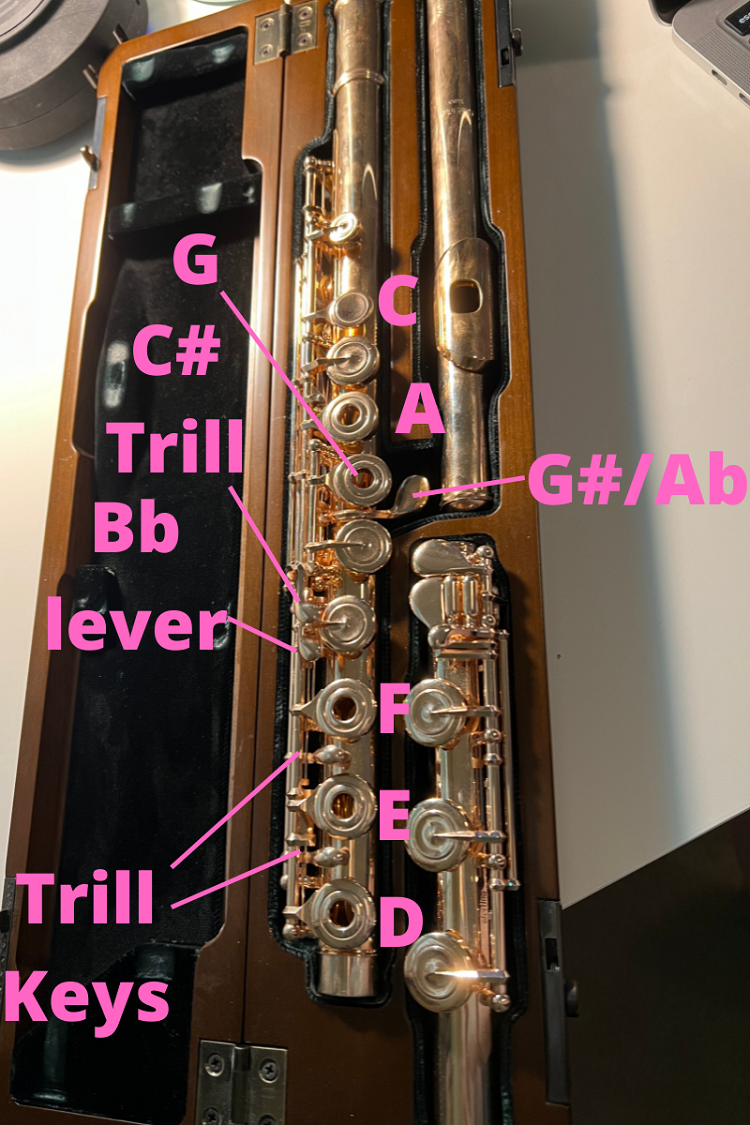
Left Hand Keys
Whether you’re left or right-handed, you’ll put your left hand on the keys closest to the headjoint. Your thumb will go on the keys on the back of the instrument.
Most flutes have two keys that your left thumb can trigger. If you close the bigger key, that will allow you to play a B natural, while the other key triggers a Bb or A#.
On the front of the flute, you’ll have four keys to close. You’ll use your index finger to close a smaller key, and the pinky goes over the lever that comes out of the instrument.
If you have an open hole flute, the other keys to close will be more obvious. When you have a closed hole, you’ll skip one key after your first finger to place your second and third fingers in the right places.

Right Hand Keys
Before you assemble your flute, finding the three main right hand keys is easy. They’ll be the three keys just before the bottom of the body.
If you have an open hole flute, all of these keys will feature holes your fingers need to cover. Even on a closed-hole flute, finding these keys isn’t too difficult.
Your right thumb doesn’t press any keys, but it does help stabilize the flute. I tend to rest my right thumb farther to the left, but other players put their thumb under the flute. Find what’s most comfortable for you.
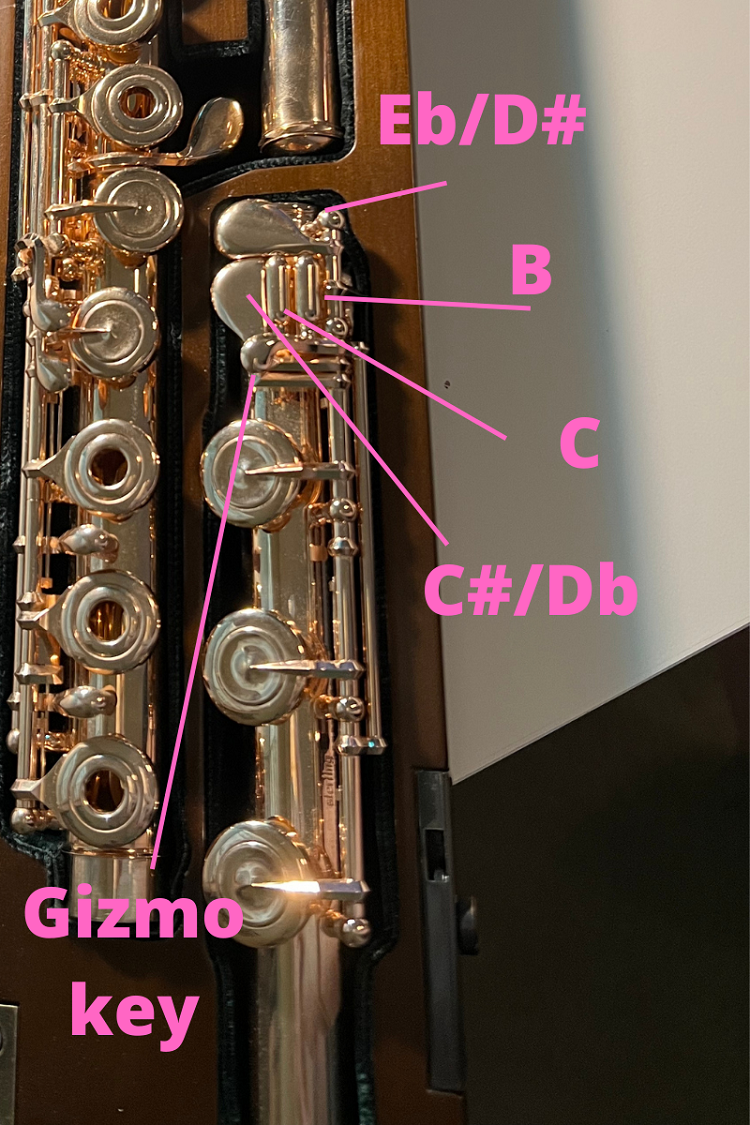
Footjoint Keys
A subset of the right hand keys, the footjoint keys are what allow you to play the lowest (and some of the highest) notes. The first key closest to your right hand helps you play Eb or D#.
However, you’ll hold that key down for almost all notes on the flute, with few exceptions. The other key lets you play a low C# or Db, and the first roller lets you play a written middle C.
If you have a B footjoint, you’ll have an extra roller that lets you play a low B. Usually, you’ll also have a gizmo key that sits on top of the mechanism, and it helps you play higher notes.
Standard Fingerings
Once you know a bit about the flute mechanism, you can start to learn the standard fingerings. It helps to use a visual chart, and most beginner flute books, like the Rubank Elementary Method, have one.
In general, removing one finger from a key will increase the pitch by a half step or a whole step. Adding another fingering will lower the pitch the same amount.
There are exceptions to that rule, but you can look at your flute to see which keys open and close as you press them. Then, you can figure out how the keys affect the pitch.
However, if you don’t want to do that, here’s an overview of the standard fingerings.
First Octave
You probably learned the fingerings for B, A, and G in the first octave when you first learned the flute. Add the first finger of the right hand to get F, and add the second to that to get E.
Pressing down all three right hand and left hand keys (except both pinkies) will produce a low D. For other notes, you’ll add the right hand pinky to produce them.
To play even lower, you’ll need to add the footjoint keys and rollers. Each one produces a different note, and if you have a low B, you have to press both rollers to produce that pitch.
Second Octave
Aside from the use of the footjoint keys, the second octave shares almost all of the fingerings with the first octave. The most significant difference is the fingerings for the D and D#/Eb near the top of the staff.
For those notes, you don’t use the first finger on your left hand. You’ll keep that small key up to help keep those notes from sounding too stuffy.
Otherwise, all of the fingerings remain the same, including regular notes, accidentals, and trill fingerings. You’ll just need to practice switching octaves to get the right pitch when you need it.
Third Octave
When you start learning the third octave, you’ll use forked fingerings. These are fingerings where you may close some keys, keep the next one or two open, and close more keys.
Most of the fingerings are similar to their lower octaves. For example, the third octave D is the same as the second octave D, but you only use the pinky on the right hand.
To play a high Eb, you’ll finger a low Eb but add the left pinky key. A high E is the same, but you’ll take off your left ring finger.
The pattern is similar for other high notes, but it’s nice to consult a fingering chart when you first learn. Then, you can get the right fingering for each note.
Alternate Fingerings

Once you learn and memorize the standard fingerings, you can start to learn alternate fingerings. Alternate fingerings come in handy when playing difficult passages.
They’re also useful for some intonation problems. Unfortunately, not all flutes sound the best on the same alternate fingerings, so you might need to experiment to find the fingerings that work for you.
Some alternate fingerings are more common and should work on your flute. Here are some of those you should know.
Bb Fingerings
The first alternate fingering that most flute students learn is for the Bb or A# in and just above the staff. Most players learn the “one and one” fingering as the basic Bb fingering.
That’s where you finger a B natural with your left thumb and first finger, but you add the first finger on your right hand. This note has two alternate fingerings, one of which is to move your thumb to the other key.
You can also produce this note with the standard B natural fingering by adding the Bb lever. The Bb lever sits just to the left of the F key, so you can reach over with your first finger.
Middle F#
On a flute, the standard F# fingering is that of G natural along with your right-hand ring finger. However, you can also produce the note using your second finger instead.
This is an easier choice for woodwind doublers since that’s the F# fingering on clarinets and saxophones. It’s also a good fingering if you have to trill between E natural and F# since you only have to move one finger.
Using the middle F# fingering is pretty common in the high register. The fingering is the same except you lift your left middle finger, and using the middle right finger can help with the pitch.
C# and C# Trill
The C#/Db in the staff and just above the staff can be very unstable. If you have to play the note for a long time, such as in the opening of Debussy’s Prelude a L’Apres-midi d’Une Faune, you need a different fingering.
A good option is to close some combination of your right hand keys. You should experiment with your flute to figure out which one works the best on your instrument.
If you have a C# trill key, you’ll have an extra lever above the Bb lever. You can finger a C natural and add this key to hold a C# or to trill from C or B to C#.
No Pinky Key
While you’ll use your right pinky key most of the time, you can remove it for some notes. If you have trouble playing a note like the E above the staff, you can take your pinky off.
You might notice it’s easier to play the note and to play it in tune. Other high notes might work better without the use of the right pinky, like high B and high C.
On the other end of the flute range, you can use no pinky when switching between low C and low E quickly. It can be hard to slide your pinky between the proper keys, so it sometimes makes sense not to use it.
Gizmo Key
If your flute has a low B key, it most likely also has a gizmo key. This key is a lever that sits above the collection of the standard footjoint keys.
It closes the B key while leaving the C and C# keys open. That can help you play notes like high C without as much tension since it can make your flute feel almost like a C foot flute.
You can use the gizmo for other high notes that you struggle to get a good sound on. Again, experiment with your flute to find a fingering that works.
Half-Hole Fingerings
One of the benefits of open-hole flutes is that you can play quarter tones. Quarter tones are notes that fall between the 12 notes in the western scale (such as a G half sharp).
Modern composers have started to use these fingerings to help set the mood of their music. A few years ago, I played a flute ensemble piece by Ian Clarke called “within…”
Some of the flute parts had quarter tones, and some of the fingerings involved closing half of a hole. Or they involved pressing down the ring of the key while leaving the hole open.
Luckily, when you have to play these passages, the composer usually includes the fingerings in the music. That way, you can use the correct fingering based on the composer’s ideas.
Multiphonic Fingerings
You probably thought that flutes can only play one note at a time, and you’re mostly right. However, modern composers have started using multiphonics that require special fingerings.
An example that comes to mind for me is Nicole Chamberlain’s solo flute piece Asphyxia. But again, you’ll find all of the fingerings you need just above the notes where you have to use them.
You can use those examples to experiment with multiphonics outside of playing solos. I haven’t played multiphonics much, and I don’t know if you can make just any combination of notes.
Still, it’s good to at least know about multiphonics in case you ever need to play them in a piece of music. Then, you can learn the fingerings quickly to help improve your playing.
FAQs about the Flute Fingering Chart Guide
Answer: For the most part, you can use the same fingerings on the flute as on the piccolo and alto, bass, and other low flutes. The written notes will remain the same, but the sounding pitches change for each type of flute.
However, only a few piccolos can play down to a low C, while most only go down to D. Low flutes also don’t always have a low B, especially when it comes to alto flutes, and some low flutes don’t have trill keys.
Answer: Not all C flutes have all of the same keys and specs. Beginner flutes tend to have closed keys, and they don’t usually have special additions, like a split E mechanism or a C# trill key.
My intermediate flute has a split E but not a C# trill, and my professional flute is the opposite. Keep those things in mind when choosing a flute and reading a fingering chart.
Answer: You would use alternate fingerings to help make notes easier. In some cases, this means using trill fingerings to help you switch between two notes quickly.
Other times, you may use an alternate fingering to stabilize the pitch of a note. That’s useful if you have to hold the note for multiple beats.
Answer: You can find tons of fingering charts online and at music stores. I really like the charts on The Woodwind Fingering Guide website.
That site includes standard and alternate fingerings. It also has charts specifically for each octave and for the piccolo as well as the flute.
Answer: You need to use your airstream: the direction and pressure. Most of the first and second octave fingerings are the same, and you don’t have an octave key like on a saxophone.
It can take some practice, so don’t worry if you can’t do it at first. Work your way up the first octave until you play the C and C# in the staff, and you can try to bridge the gap to the next octave from there.
Final Note on the Flute Fingering Chart Guide
Even if you’ve played the flute, it never hurts to refer to a flute fingering chart guide. The flute has a lot of keys, and some you only use occasionally.
Other keys are ones you use all of the time, but you might use them in different ways. If you want to learn the fingerings of each note, find a good chart you trust and keep it with your music for easy reference.
For more interesting readings check out: